
| 일 | 월 | 화 | 수 | 목 | 금 | 토 |
|---|---|---|---|---|---|---|
| 1 | 2 | 3 | ||||
| 4 | 5 | 6 | 7 | 8 | 9 | 10 |
| 11 | 12 | 13 | 14 | 15 | 16 | 17 |
| 18 | 19 | 20 | 21 | 22 | 23 | 24 |
| 25 | 26 | 27 | 28 | 29 | 30 | 31 |
- 파일 시스템
- Access denied for user ''@'localhost'
- jar deploy
- springboot
- react map error
- ps
- root
- brew install mariadb
- mysql error
- 관리
- mysql
- DB
- sts
- Docker
- install
- join
- spring framework
- 도커
- docker container
- jar배포
- systemd
- Dockerfile
- map is not a function
- springboot jar
- 도커파일
- sudo
- 설치
- Oracle
- jdk
- mac mariadb
- Today
- Total
Yoon.s
[Spring Framework] 외부 파일 import 본문
Spring 외부 파일을 가져올 때는 어떻게 해야할지 정리해봅니다.
1. import 하기
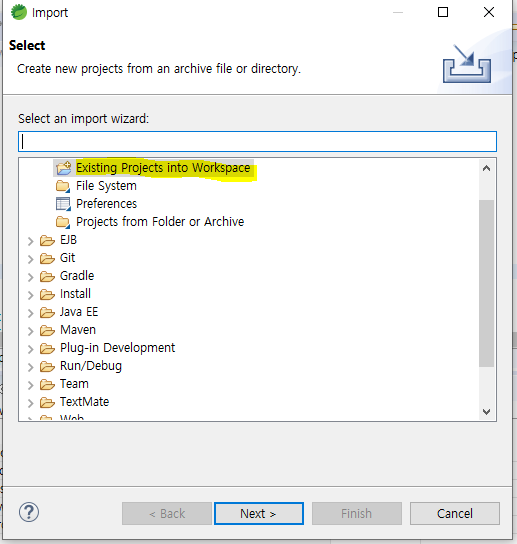
우클릭 -> import -> import
Existing Projects into Workspace 클릭 -> Next
Select archive file 을 클릭하고 해당 파일을 선택해줍니다. -> Finish
(이때 압축파일인 경우에는 archive을 선택하면 되고 압축파일이 아닌 경우에는 Select root directory를 선택해주면 됩니다)


2. 현재 사용하고 있는 java 버전과 import한 프로젝트의 버전이 동일한지 확인하기
me> Javase-11(jre)
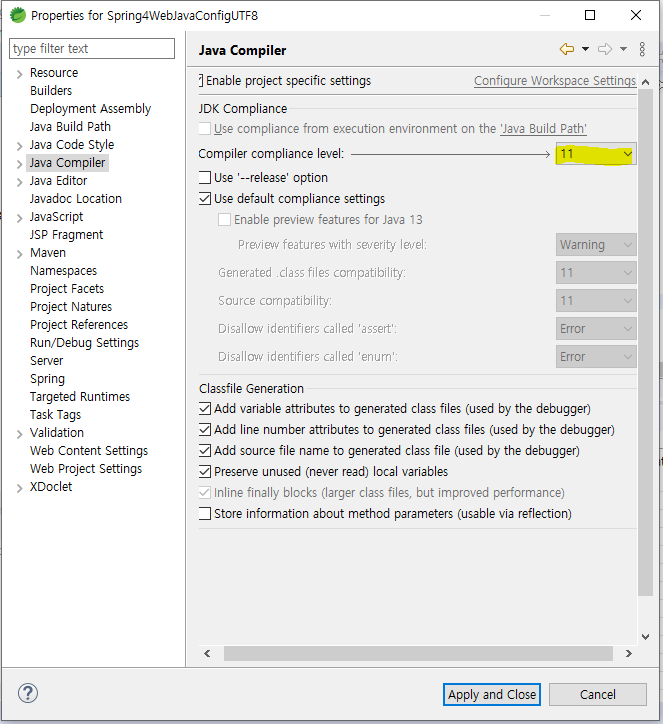
해당 프로젝트에서 우클릭 -> Properties에서 확인하기
1) Java Compiler
아래 Compiler compliance level은 1.8임을 확인할 수 있다.
이것을 현재 사용하고 있는 11버전으로 변경해줌

2) Project Facets
Java 버전 확인 1.8 -> 11로 변경


3) Targeted Runtimes
Tomcat을 체크해주고 Apply and Close

***하지만, 업데이트 시 또 다시 1.8로 넘어가는 problem이 발생할 수 있다!
그때는 pom.xml 파일에 가서 <source>와 <target>의 버전을 11로 변경해준다!!!!

3. 버전 확인하고 build path 지정
프로젝트 우클릭 -> Build Path -> Configure build path
Modulepath의 JRE~ -> Edit -> Workspace default JRE(jdk-11.0.2)로 변경 !!

4. 프로젝트를 업데이트 시킴(maven)
Force Update of Snapshots/Releases 를 체크해줌

'백 > Spring' 카테고리의 다른 글
| [Servlet] 서블릿과 JSP 시작하기 (0) | 2020.09.11 |
|---|---|
| [MyBatis] 스프링에서 mybatis 사용하기 (0) | 2020.09.09 |
| [Spring Framework] 자바 jUnit 사용하기 (0) | 2020.09.07 |
| [Spring Framework] STS에서 스프링 프레임워크 사용하기 (0) | 2020.09.07 |
| [Spring] Spring 설치& 시작하기 (0) | 2020.09.07 |


